Monday, October 31, 2011

NOVEMBER QUILTING BLOCK


So i'm super excited to be hosting this months block. As you know from our "get to know you" posts, I have two young children (2mo & 17mo) so most of my days are spent juggling the two and trying to keep them busy and happy (and to just survive through the day). We have started teaching my oldest, Jayden her ABC's and to count. So as I was looking through trying to decide what to do for this month when I came across a picture of an ABC quilt and thought that might be a fun way for her to become more familiar with them.


I want the quilt to be fun, crazy and full of color. I do want some color flow so I have chosen a simple grey which I would like everyone to use as a background material in some way. Use as much or as little of it as you would like but please be sure to use at least a little. I will need everyone to sew two blocks each so that I can get the whole alphabet sewn for the quilt. Above are the examples of what I came up with, be sure to let your creative side run wild. I want the quilt to be crazy fun, a good kids quilt:) As you will soon see (sending out martial tomorrow 11/2) I have only sent an 15"x15" inch square, I would like everyone to pull from their own scrap fabric to come up with and make their letter blocks (I have a list of who is to do what letter below) and/or to create their background. Get the letters on however you want, I used the iron on stuff (can you tell I haven't been quilting long....I have no idea what they call the stuff). Make them big or small, crazy fonts or whatever. This I am hoping will ensure unusual, colorful, creative, fun blocks for each individual letter for the kids to have a great time learning their alphabet. The finished sown block should be 11"x11".
I pulled letters out of a hat and assigned them to your names so that none would be next to each other in case the two blocks were sown in a similar fashion.
SO....I need an 11"x11" finished block with your assigned letters done anyway you want. Just be sure to use some of the material I sent. Can't wait to see what you all come up with!! Let me know if you've got questions.

Amy: F, K
Aynsley:S, L
Cheryse: AB, P
Heidi:T, I
Jennie:W, C
Katherine:X, H
Leah:N, G
Marryanne:Q, D
Rebecca:U, J
Tara:M, V
Terry:R, YZ (YZ need to be placed on the same block to fit the whole alphabet on the quilt)
Valerie:E, O

Tuesday, October 25, 2011

All done


started my square the day after I got the material from Heidi. I read her instructions about a dozen times and measured everything out twice, three time and even sometime a fourth. Amazingly both my babies went down for naps at the same time and so I thought I had it all figured out...WRONG. Once I was done with my FIRST square for some reason this...delightful block was not correct anywhere. It was too small and the crosses didn't match up properly. The horizontal pieces were way too long. Needless to say I dulled up my seem ripper on this one thats for sure...I must of pulled seems at least a dozen times on this one. It took me almost a half a day (hubby watched the kids) and all the the background fabric to make this thing work (sorry Heidi, no extras background material coming your way). I still had a good time doing it but if you look close there are a few things that I ended up categorizing as "good enough". I really can't wait to see how it turns out though, I really think this is a very fun quilt. Well I definitely learned a lot on this one. Going to be such a better sewer after this year is over:)

Sunday, October 23, 2011

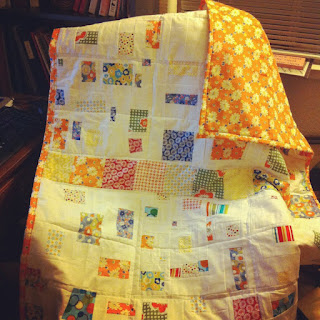
Presenting the Make it up Quilt!


Here it is! Following in the overall theme of improvisation, as I laid out the squares, I realized that it was just about the perfect size for my youngest girl's crib/soon to be toddler bed. So I scrapped my plan to make it twin size, and went the toddler route.

Since it was so small - 12 squares- it went together really quickly. As you can see, I added a row of 5 inch squares across the middle to give the eye a (somewhat busy) place to rest, and I think that really helped solidify the quilt. I used Warm and Natural batting, and I raided my stash and found a piece of the orange daisy fabric that was exactly the right size for the backing. It was meant to be! I quilted it with a simple square pattern, the batting I used only needed quilting every 10 inches, so I didn't have to do a lot. I will say that because of the wonky lines it was hard to quilt straight- so a lot of my quilting lines aren't. But my daughter won't care, and I can always claim I did it on purpose. :) And because there are so many seams in the blocks, it's hard to see the quilting lines anyway.

Here's a not so great picture of it in her bed (the light by her bed is no good!)


And one so you can see the backing.


This was a really fun project, and she loves her new quilt. Thanks so much everyone for making it with me!

Wednesday, October 19, 2011

So much fun!

I forgot how fun it is to get mail that is not a bill...the postal system seems to be underutilized for fun things these days. It is so much fun to receive these little packages of fabric goodness in the mail. Life has been crazy (I am sure everything is just super mellow for the rest of you, right?) and I haven't had a chance to check in on the blog to see how many of you have been sewing away...and then I received yet another surprise package in the mail. This is so much fun to see what everyone is coming up with for my quilt this month. I am super excited to see what happens when I can lay them all out together.

Tuesday, October 18, 2011

Two blocks in one post!

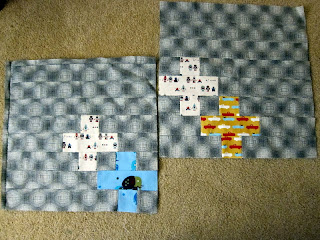
I'm posting Tara and my block, as we worked on them together. While I love the finished look of the blocks, I have to say that the gray fabric was not really our friend as we worked through the process. But I think they turned out pretty nice. Mine turned out a titch small, Tara's turned out a titch big, so it all equals out in the end. (Sorry, couldn't resist the pun.)

Mine is on the left, Tara's is on the right.

Monday, October 17, 2011

Measure 2x cut once!

Remember when your dad used to say "now honey you always want to measure twice so you only have to cute once"...I did not do that, ugh, sorry my measurements were a little off. I caught it quickly but sadly it means that my square isn't as perfect as I would like it to be. I did try to make a small one as well but again a ran out of the big pieces. Heidi you might not want to use that one, don't feel bad if you don't I wont take it personally.

Friday, October 14, 2011

Introduction and September Square


Hello fellow bee members, I'm Katherine. I'm not the best at posting things on blogs, but I am really excited to be a part of this quilting bee.
I started sewing about 3 years ago, and I learned most everything I know about sewing from Heidi and Amy. I have completed one quilt in my life, and am hoping to make many more in the future.
I enjoyed the challenge of sewing the confetti block. I was unable to wrap my head around how to create a "freestyle" block, so I ended up meticulously planning out my square with a scale model paper block. Then, after watching Heidi effortlessly whip up strips for her confetti square, I had a better understanding of the process described in the instructions. I was hoping to have another go at making a square, but the month flew by. I am looking forward to seeing the confetti quilt top in its entirety.
I am almost ready to begin working on my plus square, and I love the picture Terry posted of her finished block. However, I first have to finish up a colonial costume order placed by an eager and impatient six year old.

Tuesday, October 11, 2011

Figure it out as you go!


I've never made a modern cross or a not so modern cross for that matter. But I was intrigued when Heidi sent the fabric, the dimensions, and then said 'figure it out'. So instead of 'making it up as you go" I was left with 'figure it out as you go' as in figure it out with math!! Math-is not a word that leaves me with warm fuzzy feelings. With that, I took a deep deep breath, a pencil and paper and started 'figuring' it out! It wasn't that hard.  Why do I let that word scare me?  I'm a big girl with life experiences and I can do this! Then I DID IT! In less than 1 hour I had the block finished and felt a great sense of accomplishment! Never again, will that word 'math' intimidate me! Thanks Heidi, for taking me outside my life box! It was a fun block to do and I do love the vertical and horizontal lines that are all connected into straight lines!

Sunday, October 9, 2011

Ideas ideas ideas

Heidi love the fabric so cute, just got it yesterday!

Is anyone else totally obsessed with finding the pattern for their quilt like I am? I found mine and if any of you ladies pick mine, to bad I'm going to do it was well, can't tell you now I'm gonna keep it a secret.

How's the quilt going Maryanne? Any tips for us less savvy quilters?

Sunday, October 2, 2011

October's Block: plus (also known as a modern cross)

Hello Everyone!

Why is it so absolutely difficult to find a solid gray fabric? Not just any gray but a true grayscale gray...all of the gray's are sooo blue. Which means they end up looking purple. I even ended up ordering yards of gray fabric online only to be disappointed once it arrived. Grrr.

After working on the pattern I wanted to use for the block this month for the past few weeks I thought I was going to have to totally change directions at the last minute because I couldn't find the background fabric I wanted. All that said, on Saturday I finally found a background fabric that is going to have to work and decided it would be okay with my original pattern after all.

Okay, so here it is...

When I have seen similar designs to this all I can think of is a plus sign but patterns like this one are also often labeled a modern cross. I have a number of sample pictures I am including below and hope everyone can make it all the way through this post.

Sample full quilt illustration:


Sample individual block illustrations:

Individual block pattern:

Sample sewn blocks and a peek at the fabric (that I promise will be in the mail to you tomorrow):


(sorry, the second one is a horrible picture and if I get a chance to take another one in the daytime I will be sure to replace this one on the blog)

Info on how to make the blocks:

The larger of the two blocks above is sort of my intended base unit size (of 2" square) and finished is about 16" square (16.5" with the seam allowances). But as I made up my sample I started thinking that it may be interesting to have a variation in the size blocks that are created (hence the smaller version based on a 1" square). The key will be to decide on the unit you want to use and then cut your strips/squares accordingly.

I will be sending a stack of fabric to each of you, way more than you will actually need to make your one or two blocks. The cream and gray geometric line fabric (about 1/4 yd) is for the base color or the background and then there is an assortment of red, blue, yellow and cream fabrics (some of them are strangely shaped) to use for the +'s. Just send back what you don't use.

My assembly recommendation is to decide what your individual finished square size should be (1", 1.5", 2", 2.5"), map out where you want your colored +'s, and cut squares and strips as appropriate including seam allowance. Sew each row and then the rows together.

For example, in the larger of the two sample blocks I assembled my base unit was a 2" square. My first row consisted of a strip of the base fabric that was 2.5" high (an extra .5" for .25" seam allowance) and 8.5" long, a 2.5" square of the red fabric, and a 2.5" x 6.5" strip of the base gray. You could assemble the whole thing as squares if you want to, but I generally prefer to minimize the number of seams I have to sew in a project. The block pattern posted above is 8 units by 8 units but I am totally okay if you wanted to add an additional row or two to any side to continue the pattern.

Feel free to use as many or as few of the colored fabrics as you want, my only request is that you don't have any unfinished +'s hanging off the sides. I suppose if someone wanted to throw in a "-" without the top and bottom squares I would be okay with that.

I hope this pattern doesn't feel to restrictive after just finishing Maryanne's super free-form "make it up as you go along" blocks from last month! Thank you everyone for helping me make this quilt.

Happy sewing!

Saturday, October 1, 2011

Finished!

So as all of you will discover I am a very basic sewer so doing something that isn't pretty much a straight seem is a challenge for me but I got it done...It was between nap times and after my oldest went to bed for the night but its done! It was fun to do something so different and I look forward to seeing the finished product. I am sorry and so sad that I didn't snap a pic of what I did, our camera was MIA but I will be sure to get the next one up. Thanks again Marryanne for picking such a oddly fun quilt!